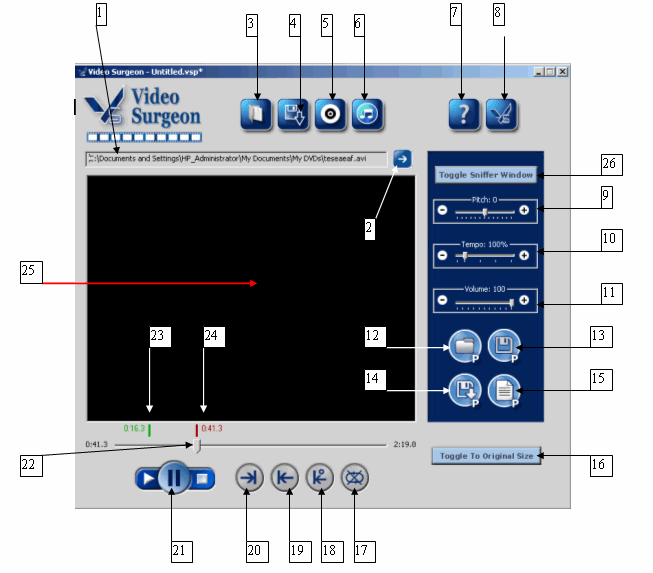
Let’s begin with an overview of the layout of the main user interface, which is shown below.
1
Address Bar
This area displays the location of the file upon which you are currently working. This address may be a
URL (http://www.xyz.com) or it may be a file path (C:\My documents\anyfolder\test.mpg). You cannot edit
this information. It is for display purposes only
2
Go Button
This button existed in earlier version but has been removed. See item #26 of this Quick Start Guide for
instructions on how to download videos.
Video File Buttons
The group of four buttons, (3-6) at the top of the page, performs functions on the raw video files.
These are NOT project buttons. The Project buttons are the group of buttons on the lower, right-hand
side numbered 12-15.
3
Open File

This is the open file button. When you click this button it opens a typical windows dialog box an
enables you to browse your computer for video files that you can open in Video Surgeon.
4
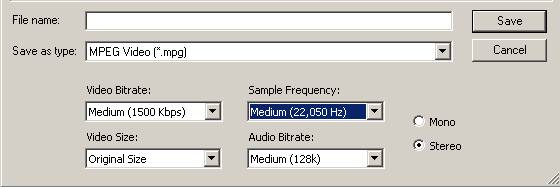
Save Current Loop As

This button functions much like a Save As button. If there are no loop point set, selecting this button
and saving the currently loaded file with a new name will result in the making of an identical copy of
the file currently loaded in Video Surgeon. However, if you have loop point set, and then select this
button, Video Surgeon will save ONLY the portion or segment of the Video that is defined by the loop
points.
When you select this button, the dialog box that opens has several functionalities built into it as
noted below. You can change the audio and video bitrate, you can change the sampling frequency, you can
change the audio type (mono or stereo) and you can resize the video.
5
Rip DVD

This button will rip the video from non-encrypted DVDs. When you click this button a Windows dialog box
will open that will enable you to browse the DVD. The DVD may have more than one folder. The file type
that you will be opening is a .vob file. These are typically stored in the video folder on the DVD.
Video object files (.vob files) can be no larger than 1 GB, therefore a DVD may have more than one .vob
file. If you would like to place the entire contents of the DVD on your computer to be able to access it
in Video Surgeon, you will need to select and rip each .vob file to your computer.
Warning – this is a CPU intensive and time consuming operation. A 1GB file may take 10-20 minutes to
rip and will tie up virtually 100% of your CPU power.
6
Rip Audio

This button enables you to rip the audio from a video file stored on your computer. For example, if you
find a song on Youtube that you would like to place on your mp3 Player or Ipod, you can download the
video using Video Surgeon – and then you can extract the audio from the video and save it as a .wav, mp3
or other file format.
7
Question Mark (Help)
The selection of this button open’s Video Surgeon’s Quick Start Guide.
8
About

This button is the About button which provides you with basic details about the Version of Video Surgeon
you are currently using. Within the menu for this button are some basic default settings for Video
Surgeon that you can customize for your use.
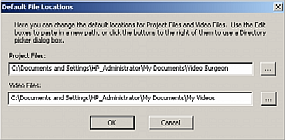
After clicking this button, locate the default file locations button. This will open a window
that looks like that shown to the right. You can use this window to change the default locations on your
computer where Video Surgeon Project files (.vsp) are stored and you can also change the location where
you store video files you download from Youtube
Project Files Sliders and Buttons
The buttons in the dark blue are on the right are project buttons. These sliders and buttons pertain to
the currently loaded video. Any settings such as slowing down a video, or the usage of loop points can
be remembered and applied in the future if you save your work as a PROJECT
9
Pitch or Key Slider
This slider changes the pitch of the video playback in either semitones (1/2 step) or cents 1/100th of a
step. The slider can be grabbed with a mouse and moved manually or the + and – buttons can be clicked or
held down to change automatically move the pitch slider.
10
Tempo Slider

This slider change the speed of playback. The available range is 50% of the original (1/2 speed) to 300%
or 3X the original speed. The slider can be grabbed with a mouse and moved manually or the + and –
buttons can be clicked or held down to change automatically move the pitch slider.
11
Volume Slider
This allows you to adjust the volume of the playback in Video Surgeon. The slider can be grabbed with a
mouse and moved manually or the + and – buttons can be clicked or held down to change automatically move
the pitch slider.
12
Open Project

This button will open a Windows dialog box and allow you to browser your computer for any saved Video
Surgeon project and open them. Video Surgeon project files use the designation (.vsp)
13
Save Project

This button will save the currently open video as a project. If the currently open video has been
previously saved as a project, it will overwrite your existing project file and its settings. When a
video that is currently open in Video Surgeon is saved as a project, Video Surgeon will remember and
save the position of the three sliders (pitch, tempo and volume), the loop points (if set) and any notes
that you may have entered.
14
Project Save As

This button allows you to save the currently open video and Video Surgeon settings as a project. If you
are working with a video that has never been saved as a project before, this button enables you to
assign a name for the project file. If you are working with a project that you had previously created,
that is open in Video Surgeon, this button will allow you to save the project with a different name –
and prevents you from overwriting the existing settings of the project file. If your intent is to
overwrite the settings of a project file, then you should use the Save Button (13).
15
Notes

The notes button opens a blank screen and allows you to type text, notes, comments, etc. into this
screen. In order for these comments to be saved and retrieved for future use, you must save them using
the Save Project or Save Project As buttons.
16
Toggle To Original Size

As the button text suggests, this button opens a second video screen of the video currently loaded into
Video Surgeon and displays it in the original size. Since videos maybe shrunk or stretched to fit into
the Video Surgeon window, using this “Original Size” button may result in either a larger or smaller
image being displayed. Once this button is clicked and the second window opens, please click the PLAY
button to start the video playing in this second screen.
Videos Surgeon allows you to use the zoom on the video displayed in this second window. Also any loop
points or tempo or pitch changes will be applied to the video in this second screen.
Loop Setting Buttons
Buttons 17-20 are buttons that are associated with loop points.
17

Cancel Loop Points
This button when clicked removes all loop point from the time line.
18

Beginning Loop Reset
This button moves the current position of the slider to the beginning loop point.
19
Ending Loop Point

This button when clicked will place a red line with a time read out, just above the video timeline,
thereby designating the ending loop point.
20
Beginning Loop Point

This button when clicked will place a green line, with a time read out above the video progress bar.
This designates the beginning loop point.
Once beginning and ending loop points are set, the video will loop continuously between these points
until stopped. If you wish to adjust the placement of the beginning or ending loop points you can click
with our mouse on the video time line. This will increment the video by 1/10th of a second. Using this
procedure, you will move the video progress slider either forward or backwards until you have the video
at the precise point that you desire. When you have located that point click the beginning or ending
loop point button again. This will reset the loop point to this more precise location.
21

Combo Button
This is a three part combo button that from left to right has these three functions: play, pause and
stop. This button controls the video playback in Video Surgeon.
22
Current Position Slider
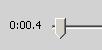
This slider indicates the current position of the video that is loaded in Video Surgeon. You can grab
the slider with your mouse and move it. When the video is in the paused position, you may also click to
the left or right of the slider, directly on the timeline and it will increment or move the video
forward or backward in 1/10 sec increments. If you click directly on the timeline and hold down on the
left mouse button the slider will continuously auto increment in 1/10th second increments.
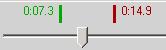
23
Start Loop Point
This green entry just above the video timeline indicates the current position of your beginning or
starting loop point.
24
Ending Loop Point
The red entry just above the video timeline indicates the current position of your ending loop point.
25
Main Window
This is the main video window on Video Surgeon. Whatever video you open, regardless of the size will be
shrunk or expanded to fit within this window. You can zoom in or out on by placing your cursor in this
video screen and left clicking to zoom in, or right clicking to zoom back out.
26
Toggle Sniffer Window Button

The "Toggle Sniffer Window" button will open the small window (shown below). This window is referred to
as the sniffer box because it is the window in which the video links appear once they are "sniffed" or
found by Video Surgeon. This window is "always on top" so you can view the window as you are browsing
the internet and looking at videos.
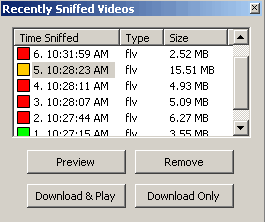
As you browse the internet and as a video starts to play, Video Surgeon will detect the video playing,
it will find the URL, and it will insert into the sniffer window a summary of what it has found. The
sniffer window displays a number which is the chronological order in which a particular link was
located. It also displays the time the link was found, the file type, and the video size. In addition to
this data, the sniffer window also contains color coded boxes. These boxes tell you the status of a
particular link in the sniffer box. The color key is as follows. Red means the video has NOT been
downloaded. Green means the video HAS been downloaded. And Orange means the video is in the process of
downloading.
There are four buttons on the sniffer window. The "Preview" button allows you to
preview the video
before you download it. Since video URLs are loaded into the sniffer box as they are played in your
browser, in many cases you will know what link corresponds to a particular video and may not need to use
this function, especially if you have only 1 or 2 links in the sniffer window. However, as the number of
links in the sniffer box grows, you many need to use the "Preview" button to remind you of the video
associated with a link before choosing to downloaded it. Please note, due to the way some videos are
created and coded on the internet this button will NOT always work, but it does allow you to preview
most videos.
The "Remove" button will remove or delete a link from the sniffer box.
There are two different types of download buttons. The "Download & Play" button, when clicked, will open
a Windows dialog box and prompt you to enter a name for the file you are downloading. Once you have
given the file a name, you will click the SAVE button on this windows dialog box, and Video Surgeon will
begin to download the video to your computer. Once the file download is complete, Video Surgeon will
begin the process of converting this file to an AVI format which is the internal format used by the
program to manipulate the video. Once the conversion is complete, Video Surgeon will open the file in
the main video window and begin to play the video.
If you are only working with a single video that you want to download and begin to use immediately, this
download options would be ideal. However if you are surfing the WWW and looking for several or many
videos that you want to download as quickly as possible the "Download Only" button would be the
preferable choice.
The "Download Only" button, when clicked, invokes a Windows dialog box AND asks you to assign a name to
the file you are downloading. Once you have done this click the SAVE button on the windows dialog box
and Video Surgeon begins the process of downloading the video.
There is ONE very important difference with this download procedure versus the Download & Play described
above: The file downloaded will be saved to your computer with the SAME file type as it is found on the
internet. For example if the video is an flv file, the file will be downloaded and saved to your
computer as an flv file. It will NOT be converted to the AVI format which the "Download & Play" option
does; it bypasses this step (Although when you open these files in Video Surgeon at a later time, Video
Surgeon will then convert these file so they can be loaded into and used in Video Surgeon). Bypassing
this conversion step after a file download is completed, means that that the downloading will occur more
quickly; and, since file conversion does take a fair amount of computing power, this approach to
downloading will not require as many system resources.
Bottom line, if you are using the Download and Play button, we recommend that you download only a few
videos simultaneously, say 3-4. When using the Download Only button, you can download many videos
simultaneously.
Alternative (YouTube) Sniffer - Due to episodic problems caused by continuing changes on YouTube, we
have built and implemented an alternative sniffer module specifically for YouTube. If the main sniffer
module is working, you do not need to use this, but if you are having problems with YT, this alternative
approach should be employed.
To use the YT Sniffer, close the main sniffer window, then use the keystrokes Control + Shift + S,
holding all three keys down simultaneously for a brief second. This will cause the alternative sniffer
window to open. Once this window is open, you can copy the URL of any YouTube video from your browser to
the clipboard and then paste it into this YT Sniffer window. Once you have done this click the Download
button and the file will be downloaded. We recommend you watch the training video for the YT Sniffer, if
you'd like to visually see this demonstrated.
27
Zooming

Zooming in Video Surgeon is accomplished by left clicking your mouse while it is positioned on the video
screen. Each successive left click doubles the level of zoom. As you zoom in more, the image on the
screen will become more pixilated which results in a loss of detail. To zoom back out, right click the
mouse button and with each click you will zoom out until you reach the original un-zoomed image. You can
zoom while a video is playing, or you can zoom while a video is paused.
Please note that where you click on the screen when you zoom make a difference.
Generally speaking, when
zooming, you should click near the area of the video that you want to see enlarged.